

1. CREATING THE BASE MATERIAL
Create a good mix always begins with creating a well defined base material. We’ll want to be sure we are creating all our fine details here. If your model is not that high poly, imperfection texture maps can go a long way in adding more and more variation to your mesh.
Start by creating a metallic material for the base.
You can get a easy gold look by manipulating the Float within the “Film Width”
We can now start to create some variation by adding in some maps for imperfections. You’ll want to use Image Textures to power your materials so you have access to the Transform and Texture Projection nodes.
Set these Transform/Projection nodes aside where they are easily accessible. These will be the master transform nodes for all of our Image Textures moving forward.
We can add some more variation into the bump map by creating some Noise nodes and mixing them together using a Multiply node.


2. CREATING A DIRT MATERIAL

Creating the dirt material is the most simple step in this process.
All you need to do is create a glossy material and reduce the specular, while increasing the roughness.
To add some subtle variation we can create a noise, similar to the way we add more variation to the gold. Play with scale, noise type, brightness and contrast within this nodes to get different results.
Finally we’ll need to be sure that our projection is the same as our image textures. Simply pipe in the projection from the master projection node we create for the gold material.
Note: that we don’t need to spend too much time creating this material because it will be heavily mixed into the gold in the next step.

3. GENERATING THE FIRST MIX

Now that we have our two base materials created, we can get started mixing them together.
Begin by creating a new Mix Material
Pipe the two base materials into the material slots in the mix and then create a Dirt node and pipe it into the amount.
Adjust the settings within the dirt node until you’ve gotten a nice mix between the two.
From here we’ll want to create more variation for the dirt node. We’ll need a map that has high contrast black and white values. In the pack I am using I have access to an AO map which works great. You may create your own high contrast map from the existing textures if no AO map is present.
Make sure your new image texture shares the master Transfrom/Projection space and Multiply it with the Dirt node.
Finally we can add more variation to the mix by adding in a mix texture and piping in a C4D noise.

4. ADDING EXTRA LAYERS OF DETAIL
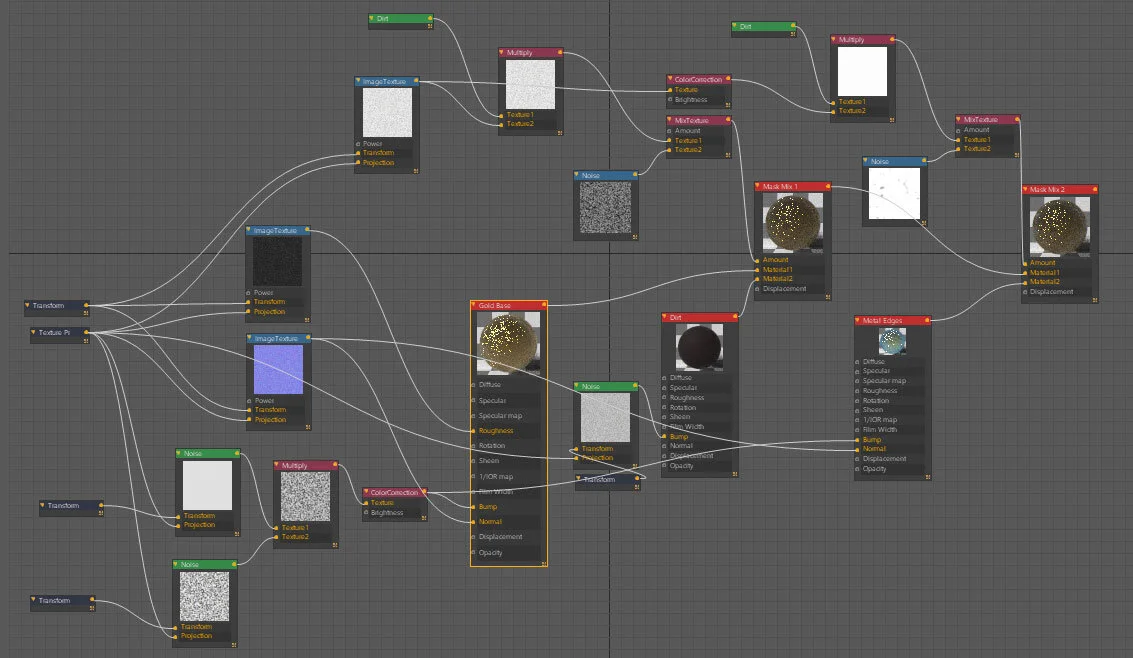
Now that we have our first mix done we can look into creating some extra layers of detail.
Create a new metallic material and give it the same imperfections we created for the gold.
Note: There’s no point in creating new ones when we can just use what’s already there. That’s the beauty of nodes!
Create a new Mix Material and follow the same process we did for the first mix. Only this time, on the dirt node we’ll want to make sure to check “Invert Normal.” This will invert the dirt node so that it is only selecting the edges of our mesh and not the crevasses.
